Using a MIDI digital piano with Logic Pro X
Introduction
MIDI is a communication protocol and electrical interface for the control of electronic musical instruments. This post will teach you just enough about so that you can do the following with a digital piano and Apple’s Logic Pro X digital audio workstation (DAW) software:
- Record piano audio
- Control a software instrument with the piano’s keyboard
- Have Logic control the piano
- Record a MIDI performance of the piano
Most digital pianos today send and receive MIDI commands over a USB connection. To use MIDI with your computer, all you’ll need is a USB A-to-B cable, or if your computer is new and lacks the old rectangular USB ports, a USB C-to-B cable.
What MIDI is and what MIDI isn’t
MIDI is a means to command instruments to produce sounds. On its own, a MIDI connection carries no audio information. That means that we’ll need some other means to record the actual audio instead of just the commands.
If you only care about the sound produced by a digital piano and not the commands produced by the keyboard, expression wheels, and pedals, see my introduction to piano recording techniques.
However, recording, manipulating, and playing back MIDI commands offers massive flexibility. A digital piano used as a MIDI controller offers the ability to play with any sound, not just sounds built into the piano itself. Logic can produce music notation directly from a MIDI track, thereby minimizing the tedium of transcription and allowing a composer to write music by simply playing. Logic can also transform MIDI commands, repeating notes, arpeggiating chords, and so on via MIDI FX.
How MIDI commands get routed
A basic understanding of MIDI command routing will save you hours of frustration. For example, when commands get doubled, you will be able to diagnose the problem and solve it easily.
Standalone digital piano

A standalone digital piano is basically a MIDI controller and an instrument put into the same box. Commands are routed from the keyboard, pedals, and expression wheels to the internal instrument.
Logic with a software instrument

Connecting a digital piano to Logic and turning off the digital piano’s internal sounds allows use of software instruments configured within Logic. Logic comes pre-packaged with a collection of software instruments but you can add your own.
A common use case is to use a different – or higher quality – piano sound than is built into the instrument. Software instruments that emulate real pianos include Modartt’s Pianoteq (a modeled instrument) and Garritan’s CFX Concert Grand (a sampled instrument). These instruments also open the possibility of using different tunings, including just intonation or well temperament, for historically informed performance of keyboard repertoire.
Logic with an external instrument

Logic can also route MIDI commands from a controller to an external instrument. Consider a Sequential Prophet Rev2 desktop synthesizer module. It has no keyboard, so some other source needs to send MIDI commands to it. Logic can do just that.
Logic with a digital piano
Bad setup
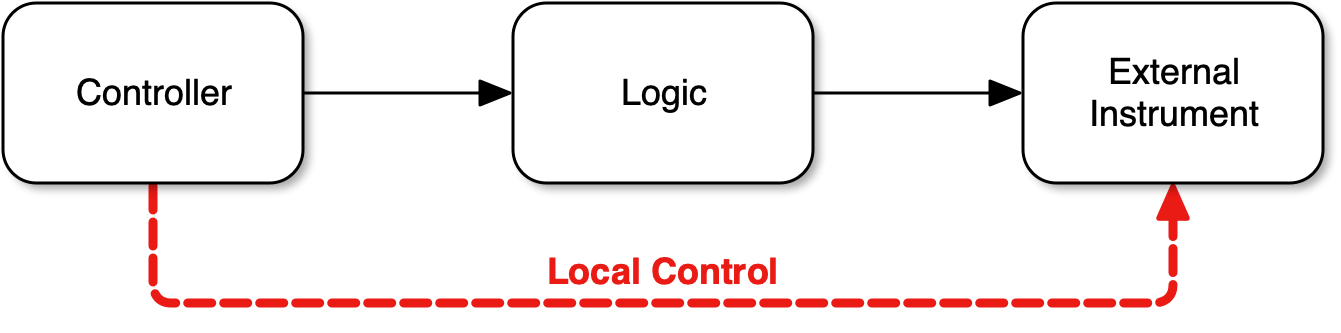
Logic with a digital piano looks just like Logic with an external instrument – except now the external instrument does have a keyboard built in. That presents a problem. The instrument portion of the digital piano will receive two copies of every MIDI command, which will make it do very strange things.
There are two ways to fix the problem.
Good setup: Turn off local control
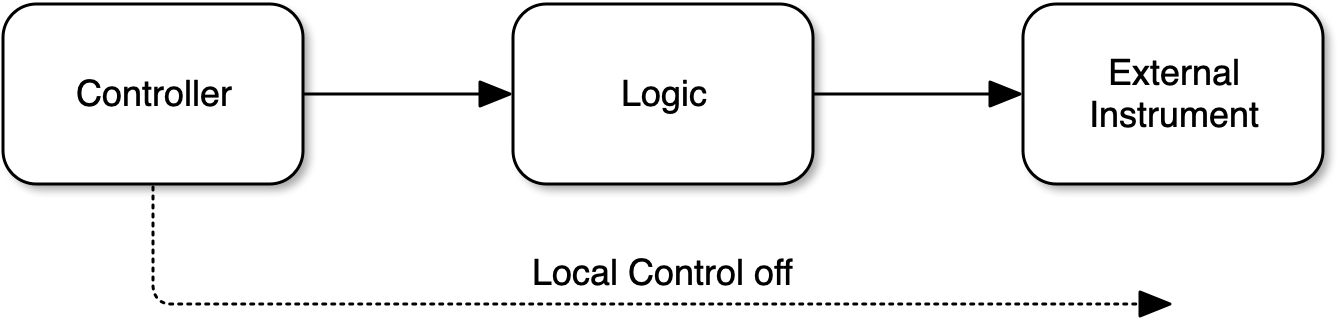
The first way is to turn off local control. Turning off local control will break the piano’s internal connection between the keyboard and the instrument. This is useful because it allows us to use the full power of Logic’s MIDI FX – arpeggiation, note repeats, and so on. However, it requires that “record enable” be selected on the associated MIDI track, or Logic won’t listen for (and send back) MIDI commands from the keyboard. As a reminder, record is enabled when the little R is illuminated in red:
 Each digital piano has a slightly different procedure for turning off local
control. Check your user manual for more information.
Each digital piano has a slightly different procedure for turning off local
control. Check your user manual for more information.
Good setup: Filter MIDI thru
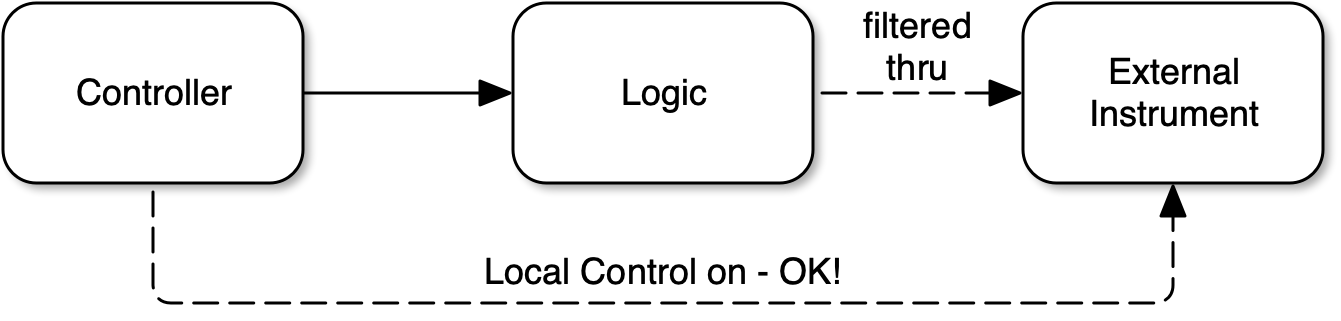
The need to turn local control off when using Logic and to turn it back on when using the digital piano standalone can be tedious. Logic may also introduce a slight delay when processing MIDI messages, which can throw off the performer.
To work around these issues, we can stop Logic from passing MIDI messages through. In this configuration, Logic will listen for MIDI messages when recording and it will send previously recorded MIDI messages when playing back, but it will never re-send MIDI messages that it receives.
Note: This method precludes use of Logic’s MIDI FX in live performance.
Setting this up is annoyingly involved, and isn’t possible when using the external instrument plugin. Allowing transformation of received MIDI data is the whole point of the external instrument plugin though, so this isn’t really a limitation.
Steps:
- Plug in your digital piano so that the USB MIDI connection is available.
- Start Logic.
- Create a new empty project, starting with an External MIDI instrument with your piano as the MIDI Destination.
- Open the MIDI environment with Window > Open MIDI Environment. Note: In
Logic Pro 10.7.3 or greater, you must hold down the Option key prior to
clicking on the Window menu for this item to show. Or press
Cmd + 0. See discussion. - In the MIDI environment, go to the “Midi Instr.” layer.
- Select the multi-instrument that’s already present, and set its Port to “Off” and its MIDI Channel to “All”. Rename the multi-instrument to “All” to reflect its new settings.
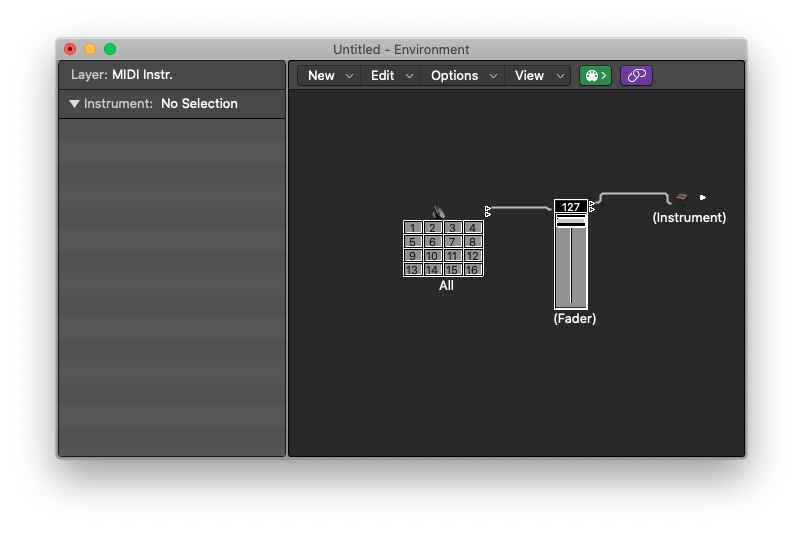
- Add a fader with New > Fader. Set its Filter to “Thru”.
- Add a MIDI instrument with New > MIDI Instrument. Set its Port to “All” and its MIDI Channel to “All”.
- Wire the multi-instrument’s output to the fader’s input.
- Wire the fader’s output to the MIDI instrument’s input.
The result will be a MIDI environment that looks like this: